#
Webhooks (Part 1)
This has been a rather demanded topic recently, everyone wants to know how to use the webhooks, so here I am with this guide to explain the basic coverage of the webhooks.
As per usual let's grab the example source code.
const { Client, Intents } = require("discord.js");
const client = new Client({
  intents: [Intents.FLAGS.GUILD, Intents.FLAGS.GUILD_MESSAGES]
});

client.on("ready", () => {
  console.log("I am ready!");
});

client.on("messageCreate", (message) => {
  if (message.content.startsWith("ping")) {
    message.channel.send("pong!");
  }
});

client.login("SuperSecretBotTokenHere");
Right, we'll start off slow, we need to create a webhook first, if we look at the documentation it comes with an example, that is basically all we need to create a webhook, but we'll add some polish to it and throw it into a basic command.
// This will create the webhook with the name "Example Webhook" and an example avatar.
message.channel.createWebhook("Example Webhook", { avatar: "https://i.imgur.com/p2qNFag.png" })
// This will get the bot to DM you the webhook, if you use this in a selfbot,
// change it to a console.log as you cannot DM yourself
.then(wb => message.author.send(`Here is your webhook ${wb.url}`))
.catch(console.error);
This is what it should look like if you test the code.


Now, that's all well and good, we can create the webhooks and get our bot to DM us, but the values are hardcoded, which means if we run that command, we'd get webhooks by the same name / avatar all the time, let's fix that shall we? we'll be looking at the command arguments page.
You should have a message handler that looks something like this.
let prefix = "~";
client.on("messageCreate", message => {
  let args = message.content.split(" ").slice(1);
  if (message.content.startsWith(`${prefix}createHook`)) {
    message.channel.createWebhook("Example Webhook", { avatar: "https://i.imgur.com/p2qNFag.png" })
      .then(wb => message.author.send(`Here is your webhook ${wb.url}`))
      .catch(console.error);
  }
});
So far so good, but we're going to run into a problem, what if you want to give your webhook a name that contains spaces? Right now you'd end up with the avatar url in the name, so we're going to have to use some regex, Regular Expressions is very powerful, and very daunting to start out with, but don't worry, the regex I'm going to supply for this example works, just drop it in your code and you're good.
Here's the regex on it's own
/https?:\/\/.+\.(?:png|jpg|jpeg)/giUsing the above regex with match, replace and test will allow you to isolate the image url in the string and leave the remaining string to be used as the webhook's name, there's an amazing online tool called regex101.com, with that tool I was able to create the above regex, here's an image of it in action.
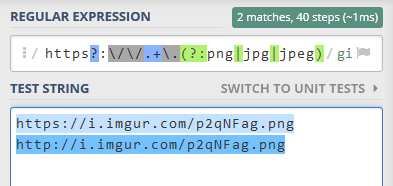
I'm not going to go into much detail, but the fact that both of the test strings are highlighted, and it's saying there's 2 matches is all we need to know, it works with links starting with http and https, and it looks for valid extensions, which are jpg, jpeg and png.
let's do the rest of the command shall we? we've got our regex, and we know we need to use match, replace and test, so we should test for a link first using our regex, if it returns false we need to notify the user, if it returns true we need to match and replace for the rest, the code can look like this.
const nameAvatar = args.join(" ");
const linkCheck = /https?:\/\/.+\.(?:png|jpg|jpeg)/gi;
if (!linkCheck.test(nameAvatar)) return message.reply("You must supply an image link.");
const avatar = nameAvatar.match(linkCheck)[0];
const name = nameAvatar.replace(linkCheck, "");
message.channel.createWebhook(name, { avatar })
  .then(wb => message.author.send(`Here is your webhook ${wb.url}. \n\nPlease keep this safe, as you could be exploited.`))
    .catch(error => console.log(error));
Alright, now let's throw that together with our bot code and issue the command!

And let's check the channel webhooks!
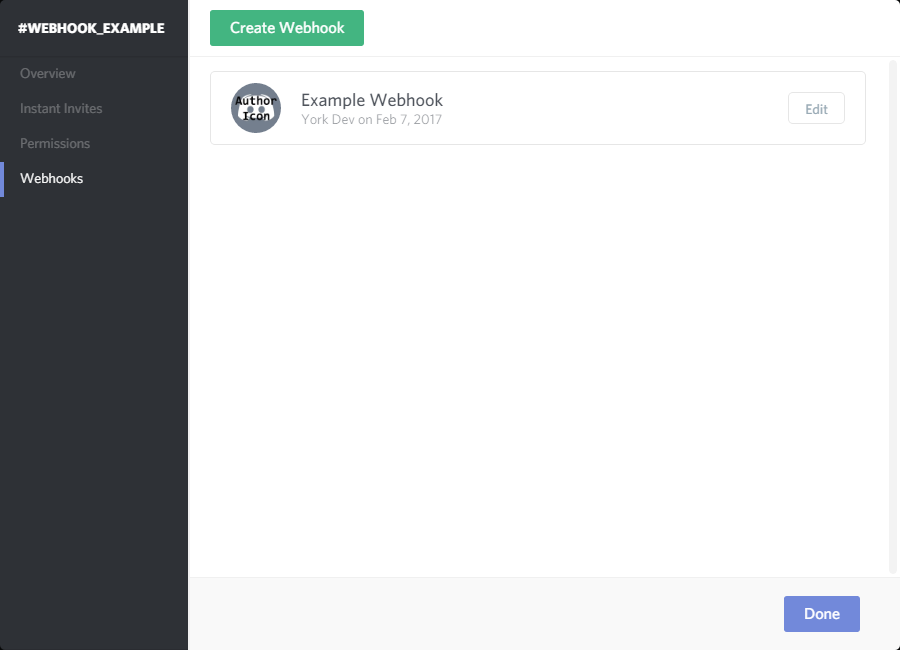
Wooo! we did it!
Now we can create webhooks on the fly via our bot code, but in the next chapter we'll see what we can do with them!